Crawl Space Encapsulation Tips & Information
A Closer Look at the Encapsulation Material
- Crawl Space Vapor Barrier– This is the vapor barrier that will seal out the dirt, odor & moisture
- Foundation Seal Tape™ – This tape is used on the foundation wall to secure the vapor barrier. The walls have to be dry and clean in order for this product to work properly.
- StickE® Seam Tape – This tape is used to seal the seams in the vapor barrier.
- Foundation Pins™ – This is the white plastic fastening pins used to hold the vapor barrier in place permanently
- Drain Tile – This is the tube (tile) that directs water to the sump basin. It is installed on the inside of the crawlspace and is 4" in diameter and flexible.
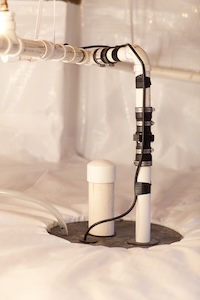
- Sump pump – This is the pump that removes water from the crawl space and is installed inside the sump basin
- Sump basin – This is a basin (or tub) that captures the water from the drain tile as well as water standing in the crawl space.
- Also available in a Sump Pump Kit
- Drainage stone – This is pea stone (or other small rock without sharp edges) used to filter the dirt out of the water before it reaches the sump basin. Use drainage stone around the sump basin and around the drain tile.
Crawl Space Inspection
Crawl Space Access- The access to the crawl space will determine a few things-
- Comfort in getting in and out (which you will be doing a lot of during the repair process)
- Ease or difficulty in getting the material into the crawl space
- IF outside, the amount of dirt/mud that will end up on top of the SilverBack® after the install
- IF inside, the amount of dirt/mud that will end up in your home if not properly protected
Head Height
- Obviously this is an important factor in the ease of the job
- If the height is less that 18" your job will be extremely difficult if not impossible
- Beware of heat ducts, they have sharp edges
- The lower the head height the more physically demanding the job will be
Helth & Safety Precautions
- Wear a good quality respirator- this will be uncomfortable but will protect your lungs from dust, mold spores, fiberglass, and bacterial in the air
- Do not work in standing water- It could be contaminated and make you sick or it could be an electrical shock hazard
- Be cautious not to over heat if installing in the summer – Drink lots of water
- Keep a look out for electrical wires lying on the ground – If they are bare then you may want to call an electrician
Foundation Conditions
- Check the foundation to see if there is a white powder on it – this indicates water problems. The white powder is efflorescence NOT Mold.
- Check for large cracks or broken areas, you will need to fix this before you start the crawl space encapsulation®
- Check the foundation for water, wet areas or condensation;you may have to drill holes to release any water. If this is present you will need to install a drain system
Supports and Obstructions
- Take a look around the crawl space for water tanks, a furnace or other objects that need to be worked around. If you take pictures of these we can help guide you with how to handle them
- Supports that hold up your home will need to be worked around as well
Insulation
- Wet crawl space insulation must come out, this is the most common reason fiberglass insulation falls from the ceiling
- If you have an odor problem then the existing insulation must come out in order to fully extinguish the problem
- New insulation at the rim (or band) joist will help keep your heating bills down as well as insure you have evicted any rodents living there
- Depending on your location and amount of foundation wall above grade you may want to install rigid insulation on the foundation walls
- Check your local energy or building code for the most accurate information on insulating a crawl space in your state
Foundation Vents
- To completely control the moisture in the crawl space the vents MUST be closed permanently
- An 8" x 16" concrete block will fit nicely into the vent cavity. Use a concrete caulk to seal the edges of the block.
- If that is not an option, you can use rigid foam insulation to seal the vent from the inside. CAUTION- Mice and other rodents can chew through the foam insulation so only use this option of all else fails
Water Control
Have you ever had water in your crawl space?
Unless you look in your crawl space at least twice a week, every week you cannot be accurate in answering this questing. It is safer, easier and cheaper to add a drain system BEFORE the encapsulation. You don’t want to find out there is a problem once you have a swimming pool under all of your hard work
Crawl Space Measurements
- Take accurate measurements, this will save you a monetary heartache later
- You will need the length of ALL the walls, no not estimate
- You will need the height of all the walls or the height of the tallest wall
- You will need to know how many supports there are and how far from the walls
- You will need to know how many foundation vents you have
Tools
- Respirator
- Crawl Space knife with many blades (10-25 on average)
- Lights – 250 watt works well. 500 watt are very hot and can melt the SilverBack®
- Extension cords
- 7/16 socket for sump basin lid
- Hammer drill for the Foundation Pins- not a drill with a hammer feature, this is important so you do not damage your foundation and/or work harder than you need to. Other companies say that mechanical fasteners are not needed – This information is WRONG. Every professional company uses a mechanical fastener, if this step could be skipped we would skip it ourselves
- Small shovels
- Small pick- for digging hard earth
- Reciprocating saw- cut PVC for sump and cutting roots
- Hammer – to tap in Foundation Pins™
- VC glue- Plumbing sump pump Not CPVC glue they are different, make sure you check
- Tape Measure
- Small hand brooms – prepping walls for Foundation Seal Tape™ and clean up
- Wire hangers or zip ties for cables or phone lines that hang down or touch the ground
- Flashlight
- Garbage Bags
Conclusion
Most jobs for a beginner will take about 2 – 3 days to complete depending on how many people are helping. We offer technical support, free of charge, to help guide you through the process. Please contact us to explore how we can help 864-223-7800.
Find best practices for Crawl Space Encapsulation®
CrawlSpaceRepair.com is here to help you find the answers you are looking for. We publish these articles to help guide you to a successful crawl space repair project
by
Matt Leech on Tuesday, March 20, 2018 8:07:00 AM
Cat Pee Smell, Where It Is Really Coming From
The “nina” of crawl spaces makes videos claiming string reinforced vapor barriers are “glued” together and the polyester string used as the reinforcement is the cause of the cat pee smell. This article will use science to show you the actual cause and solution of the cat pee smell while exposing this “nina’s” claims for what they are, ignorant.
This entry was posted in
.
by
Matt Leech on Monday, August 17, 2015 10:15:00 PM
Cost and benefits of crawl space encapsulation®
The negitive impact an open crawl space has on a home extends from comfort to energy waste. The research is in, the impact of indoor air pollution, costly structure repairs and the strain on the heating and cooling system caused by the crawl space environment has more home owners looking to enclose their crawl space as an all in one solution. Let us explore how is this done and how much should it cost.
This entry was posted in
.
by
Matt Leech on Tuesday, August 11, 2015 11:50:00 AM
Crawl Space Insulation Tips
The hot topic for the fall season is, what is the proper way to insulate a crawlspace? There are really two ways to get the most bang for your buck: one is adding insulation in the crawl space in the proper place, in the proper way and the other is to close the foundation vents that let in the outside air.
This entry was posted in
.
by
Matt Leech on Wednesday, July 15, 2015 10:43:00 PM
How To Install A Crawl Space Vapor Barrier
Ten steps to a successful crawl space encapsulation, laid out by CrawlSpaceRepair.com. This is a project that will take some time to complete, so make sure you don't have to do it twice...
This entry was posted in
.
by
Matt Leech on Saturday, February 7, 2026 9:13:00 PM
To get the most out of the SilverBack™ vapor barrier and foundation insulation, be sure to install both correctly. This diagram shows how to install them in your crawl space. Click this link to learn more about crawl space insulation. By installing the crawl space vapor barrier over the insulation you will prevent holes in the vapor barrier from securing the rigid foam to the wall. It goes without saying that the holes would not be a good thing. The rigid foam will not absorb moisture....
This entry was posted in
.